Vintage Wine Crate Coffee Table
**** ~ GREAT NEWS!!! For all you Non-DIYers out there. The Crate Coffee Table is now FOR SALE! Go to my For Sale page for more information! ~ ****
New: Check out the new Inspiration Page! See what other readers have created.
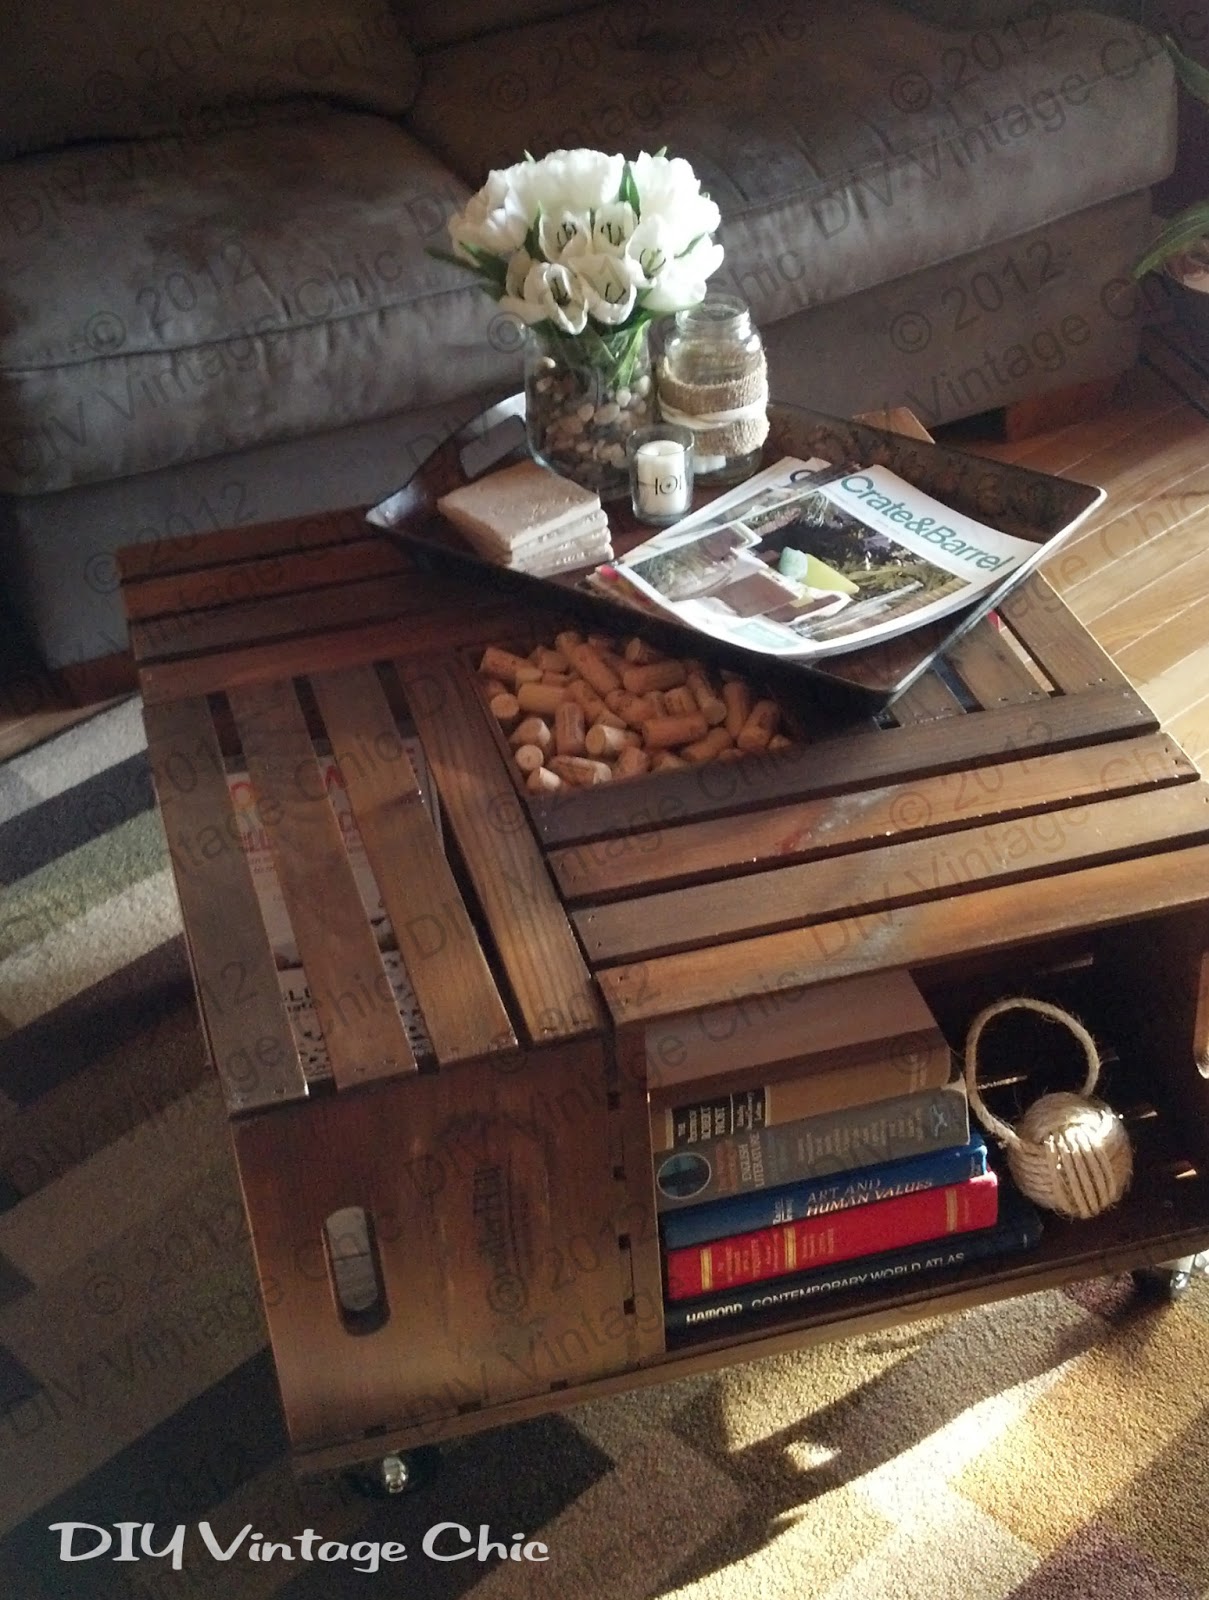
At last! I've finally finished my coffee table and I'm so excited to reveal it! I'd love to say it's perfect but like with any art project, given the chance to do it over again I would change up a few steps. But it's still pretty cool! ;)
 |
| The leg is a little wobbly. Check out the update here! |
Materials:
~ 4 Wooden Crates ~ I already had one on hand from Michael's so I bought 3 more. Using their 40% coupon for each crate they came to just over $7 each. (I'd love to make a table with actual vintage wine crates) Crates are 12.5"W x 18"L x 9.5"H.
~ Two 1x4 ~ I used Pine but it shouldn't matter
~ 4 Casters ~ {Update: check out how I've made rustic looking casters here} I already had these on hand but this is one thing I would change. I thought about trying to rust these a little but I actually wanted the functionality to be able to un/lock the wheels and I was afraid intentionally rusting them would cause some problems. So next time I'll look for casters that are all black or have a rustic look.
Optional Materials:
~ Images (not necessary if you use a real wine crate) - I found one on The Graphics Fairy and a few others online
~ Mod Podge ~ Matte Finish
~ Stain ~ Vinegar, steel wool and brewed tea {See my Stain Tutorial for more options}
~ A variety of screws, nails, L brackets, and bolts
~ Satin Polyurethane
Final Dimensions: 27"W x 27"D x 17"H
Total Cost: $7 (x4 crates), $8 worth of wood for the frame and $7 per caster = $72
*price does not include screws, nails, stain or finish.
I'm not intentionally being vague but unless you go out to buy these exact crates from Michael's then your measurements are going to be completely different than mine.
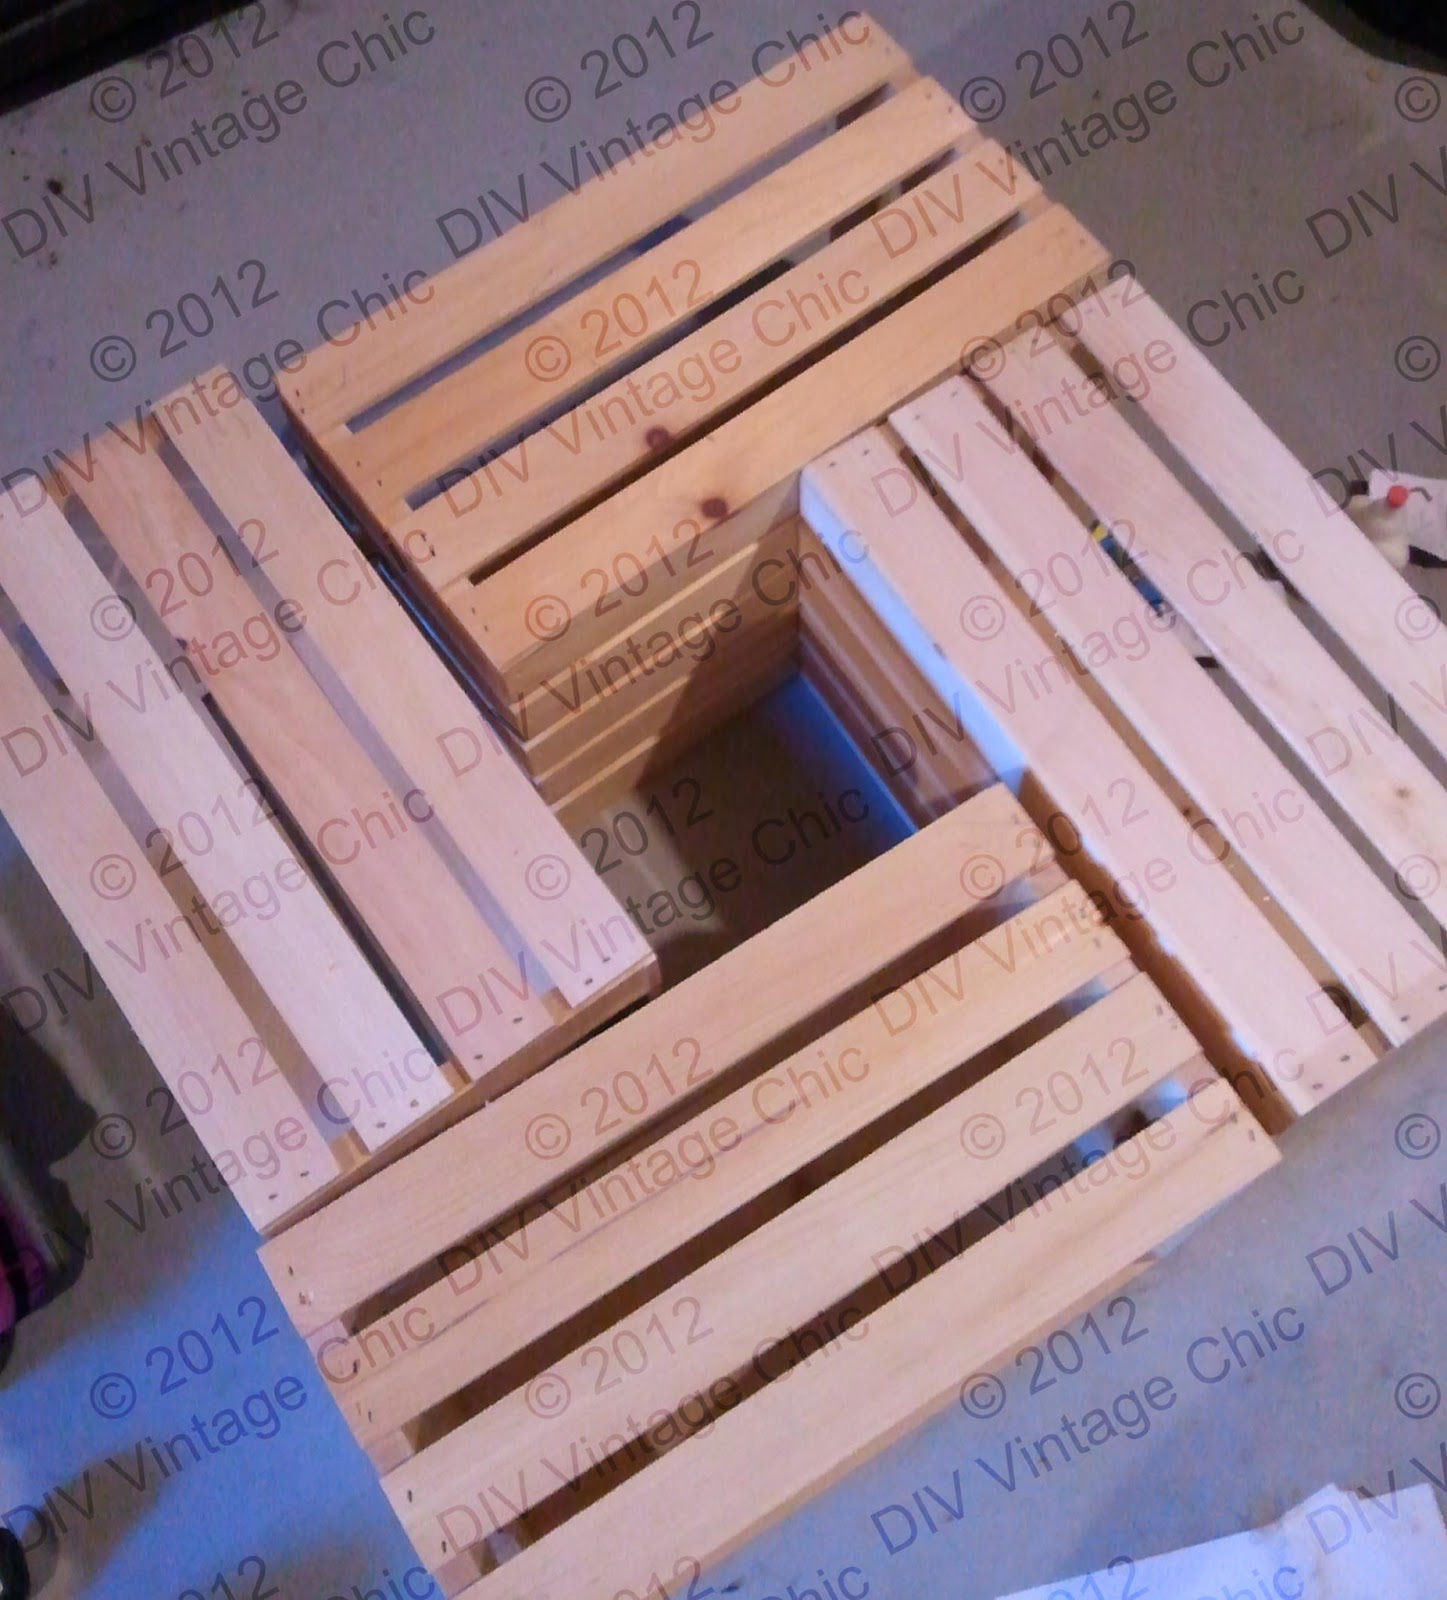
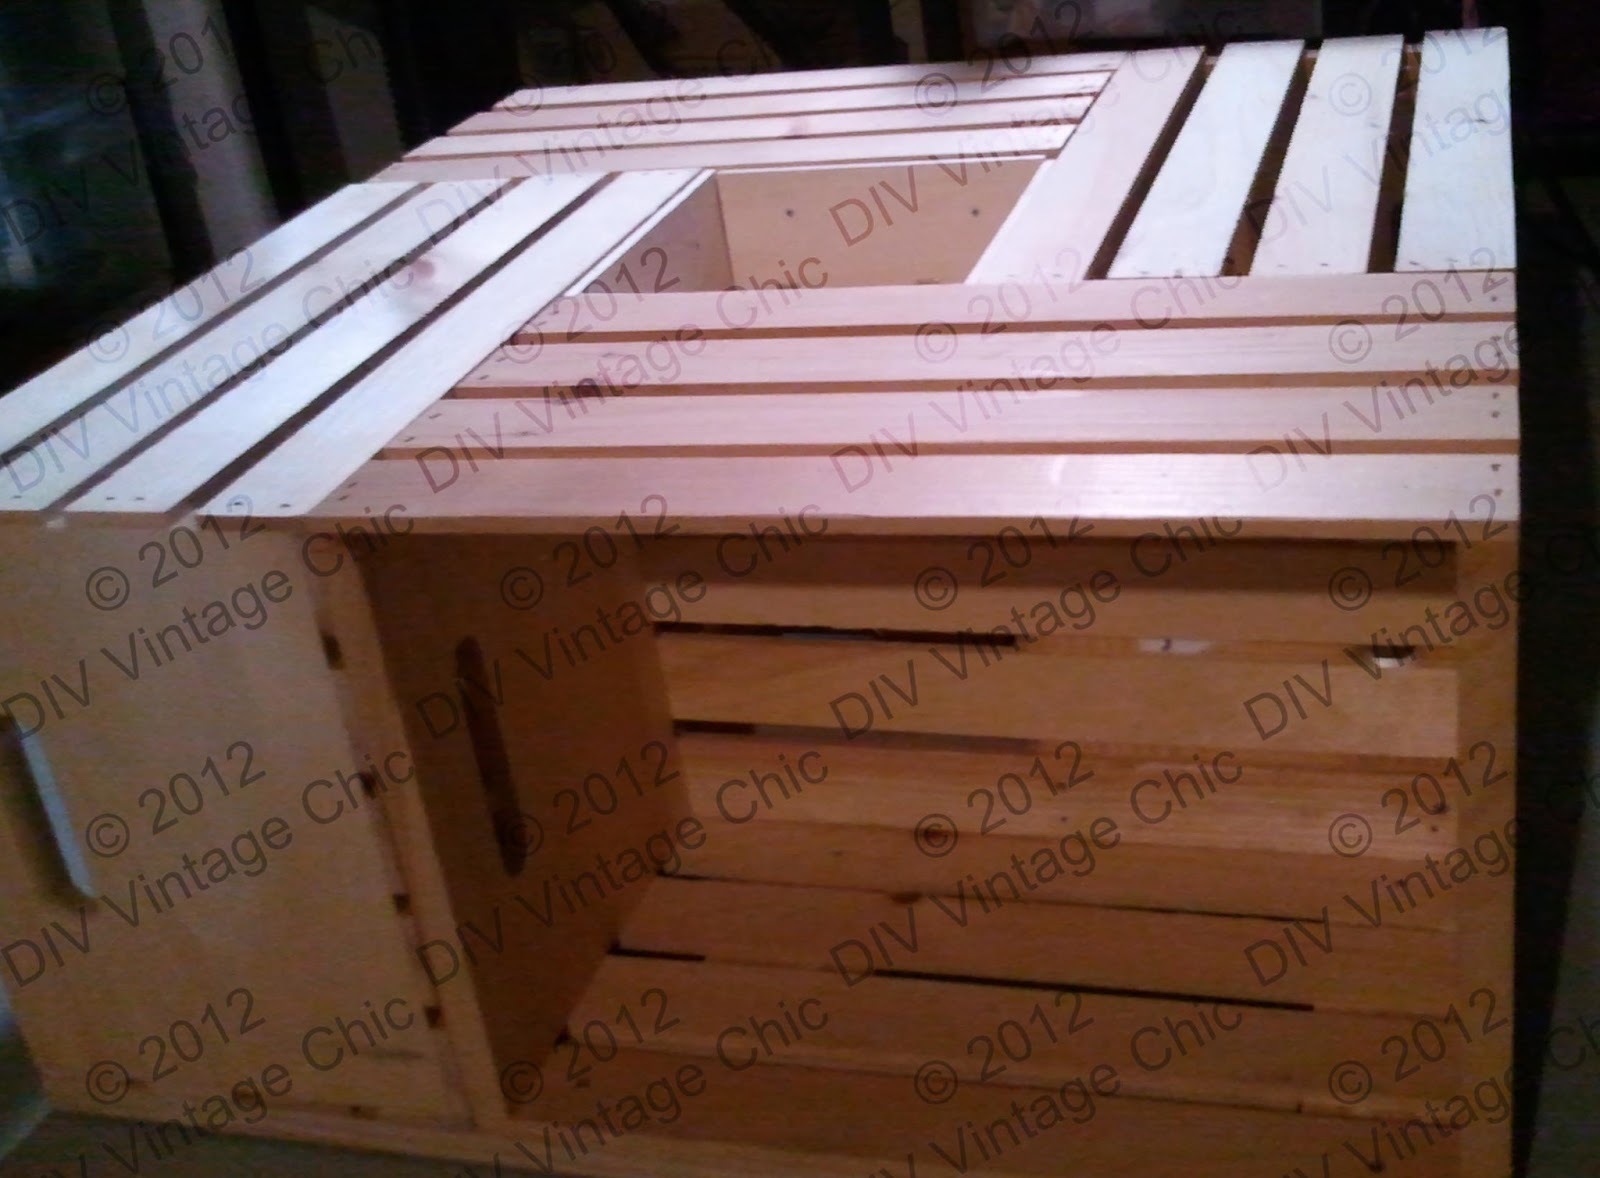
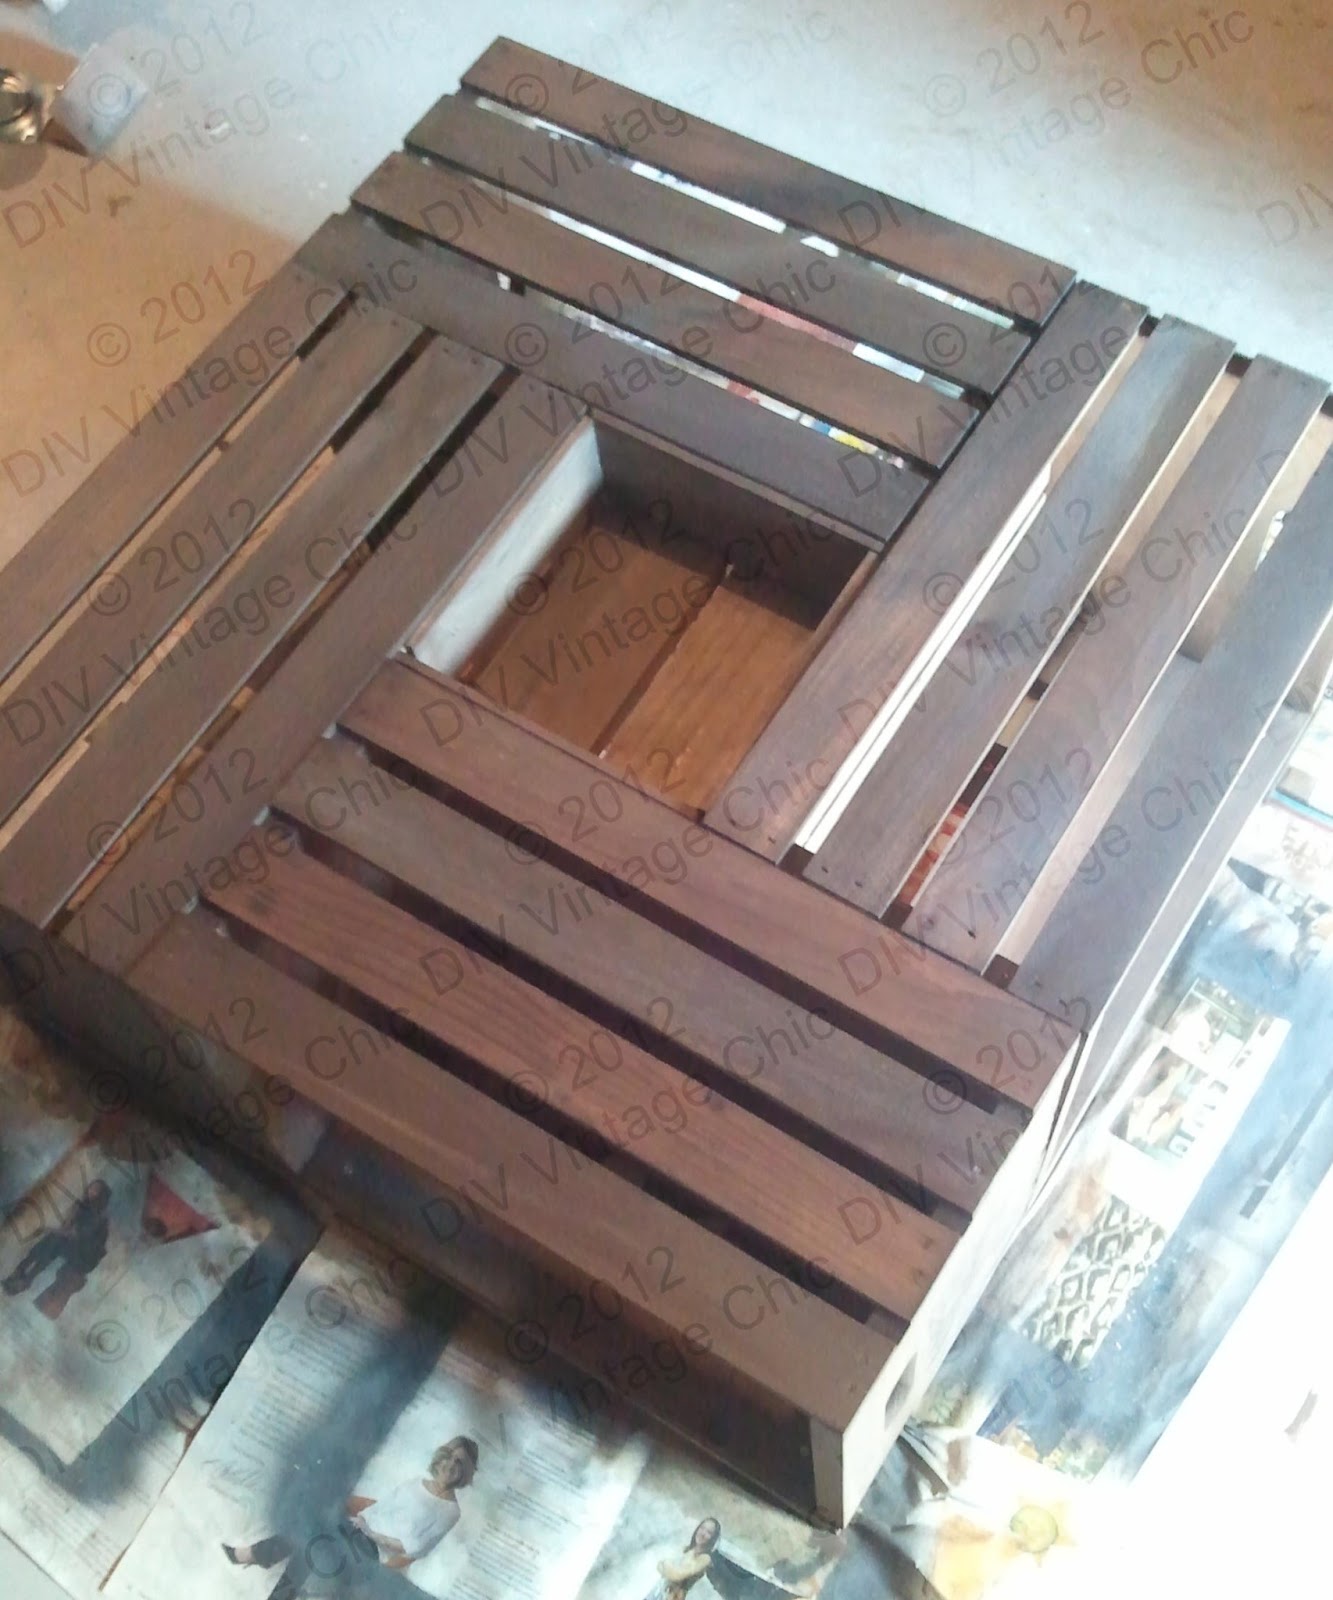
I figured out the arrangement of the crates. Don't worry about the hole in the middle, I'll get to it.


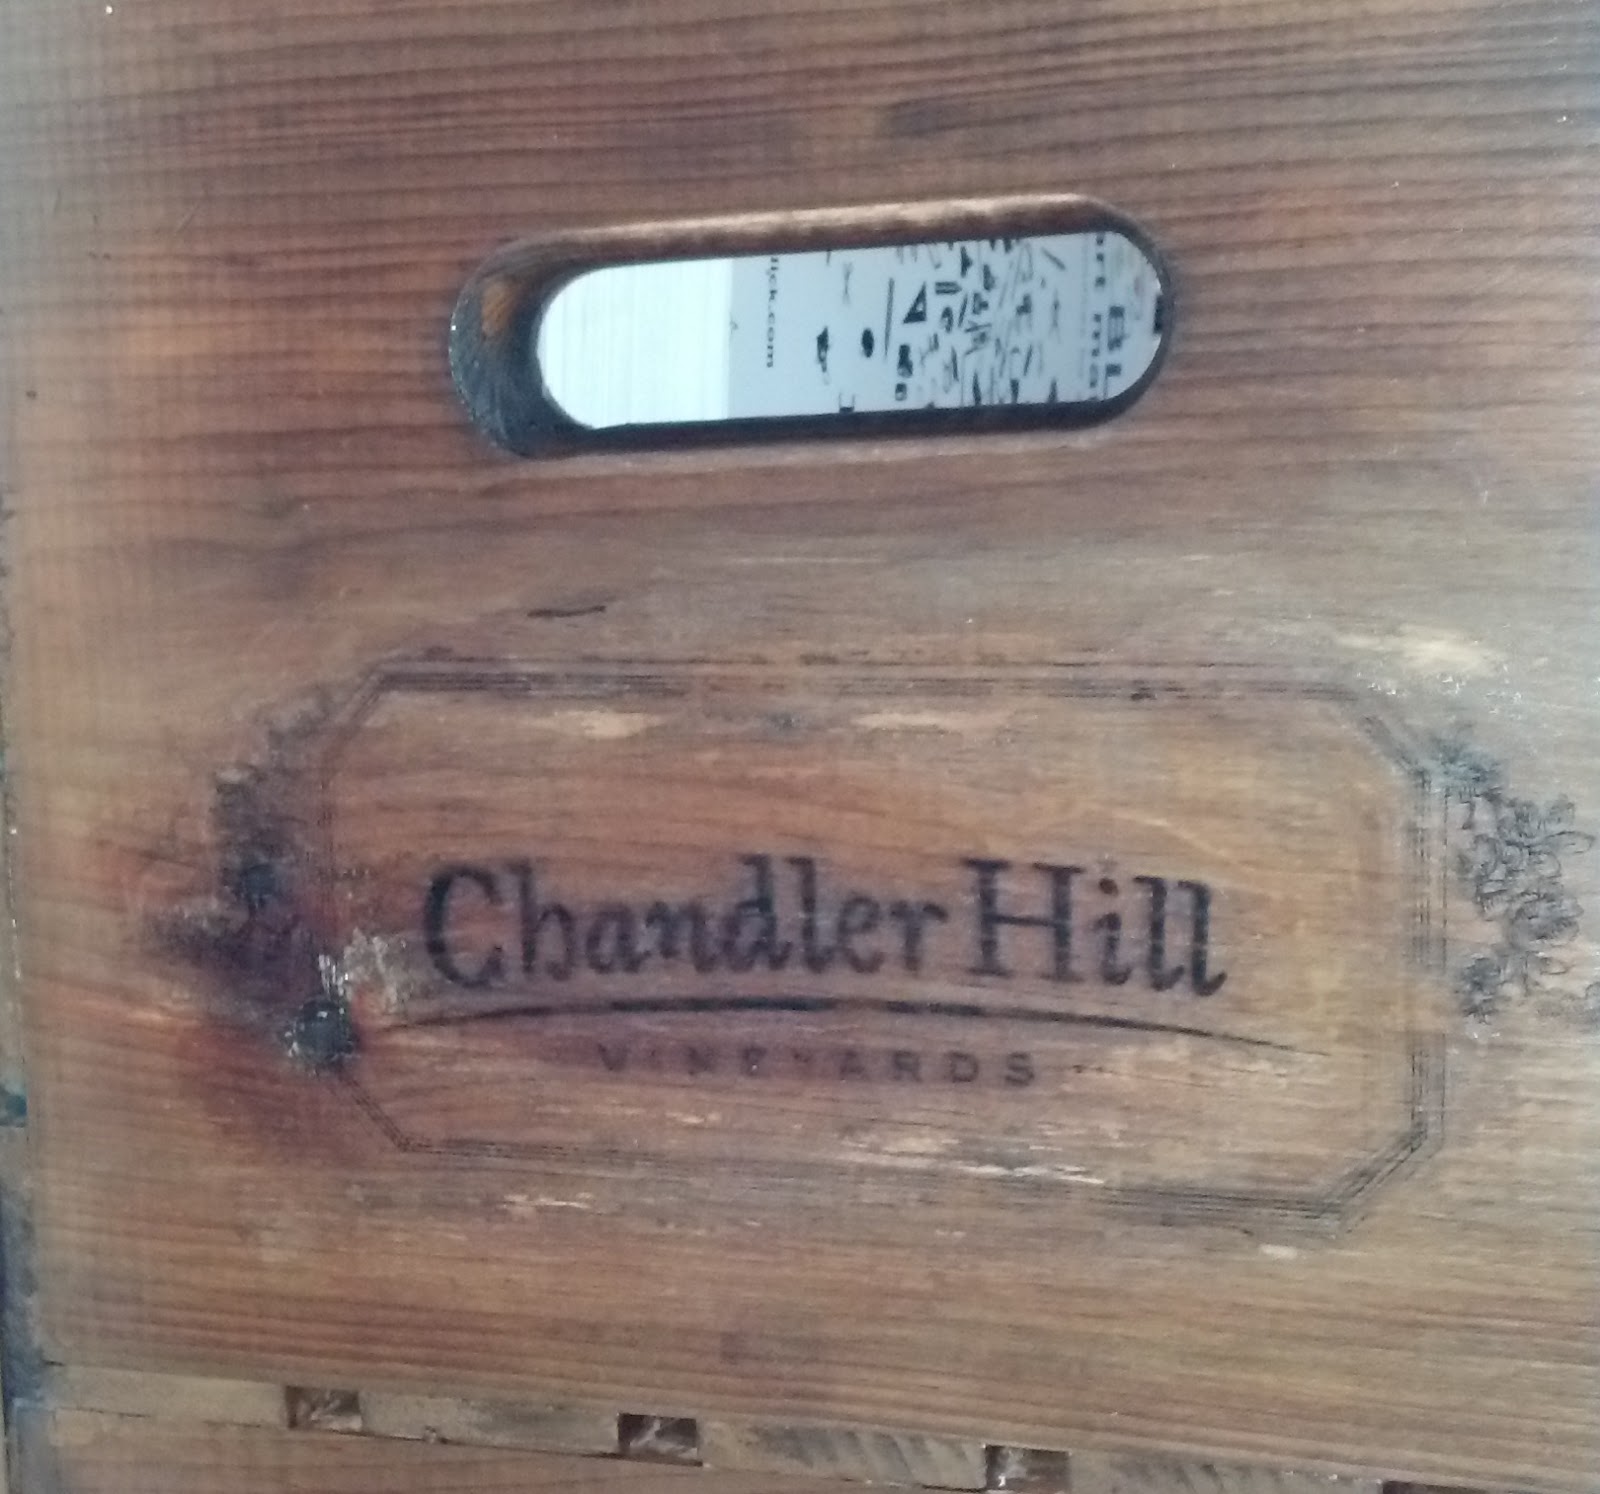
Next I transferred over my wine images. Again, I need to change the order of this step. Once I stained the wood the images were almost completely gone. But at the time they looked great!
 |
| The Graphic Fairy provided this graphic |
 |
| I also used this border from The Graphics Fairy with our fav winery, Chandler Hill in the middle |
My Transferring Images to Wood Tutorial has now been posted.
Stain time! One week before staining I put about 2 cups of vinegar in a container along with a steel pad (SOS pad) and let it sit for a week. Right before I planned to stain I heated about 4 cups of water until it was almost boiling and then steeped 2 bags of tea. (I'm guessing the flavor of tea doesn't matter considering a used Lipton's Mango Team. Definitely made the basement smell good.) After the tea has steeped for a bit use a paint brush and coat your wood with the tea. The 4 cups I used was just enough to cover all the wood and a little more.
 |
| It's a little hard to tell but the wood be a little darker from the tea |
 |
| Don't plan on reusing your Tubberware container... unless you're staining something something else |
 |
| Honestly, when I put the stain on the wood looked black, but it lightened up quite a bit |
 |
| I tried to smile and look happy but 1) I'm wearing a mask and 2) I wasn't very happy. |
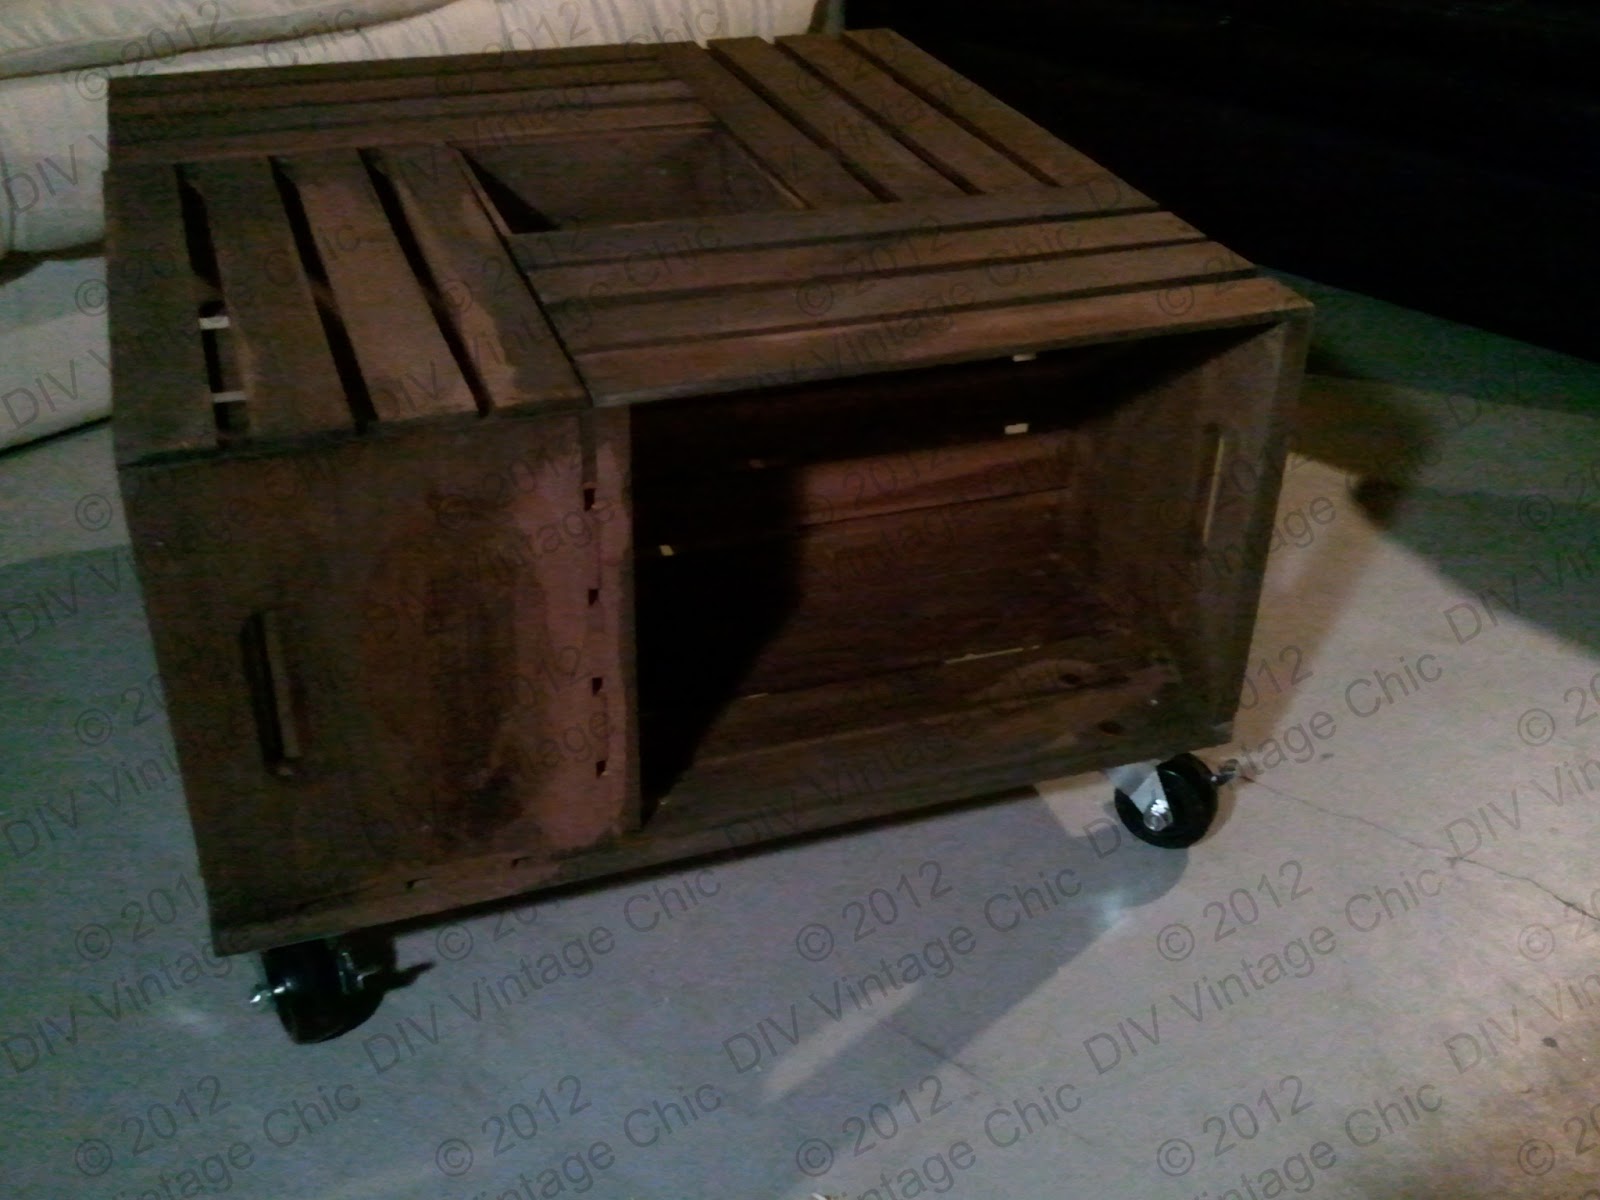 |
| I really wish I had more rustic looking wheels. :/ |
 | |
| I think I might have been too excited. I printed a reverse image and then covered the print in Mod Podge and waited for it to dry |
 |
| Or at least I thought I waited. The Graphics Fairy imaged turned out the best out of all of them. |
Last but not least, polyurethane. I used a Satin finish. Next time (if I choose to create another for some reason) I would use a lighter stain and I would like to try a beeswax sealer. I haven't found it in any store but I did find how to make your own on Pinterest!
 |
| Tada! |
 |
| This is about as close as I could get. I do love the wheels on this table and it's made from reclaimed wine crates. You can find it online at Hudson Goods. But can you believe the price tag? |
 |
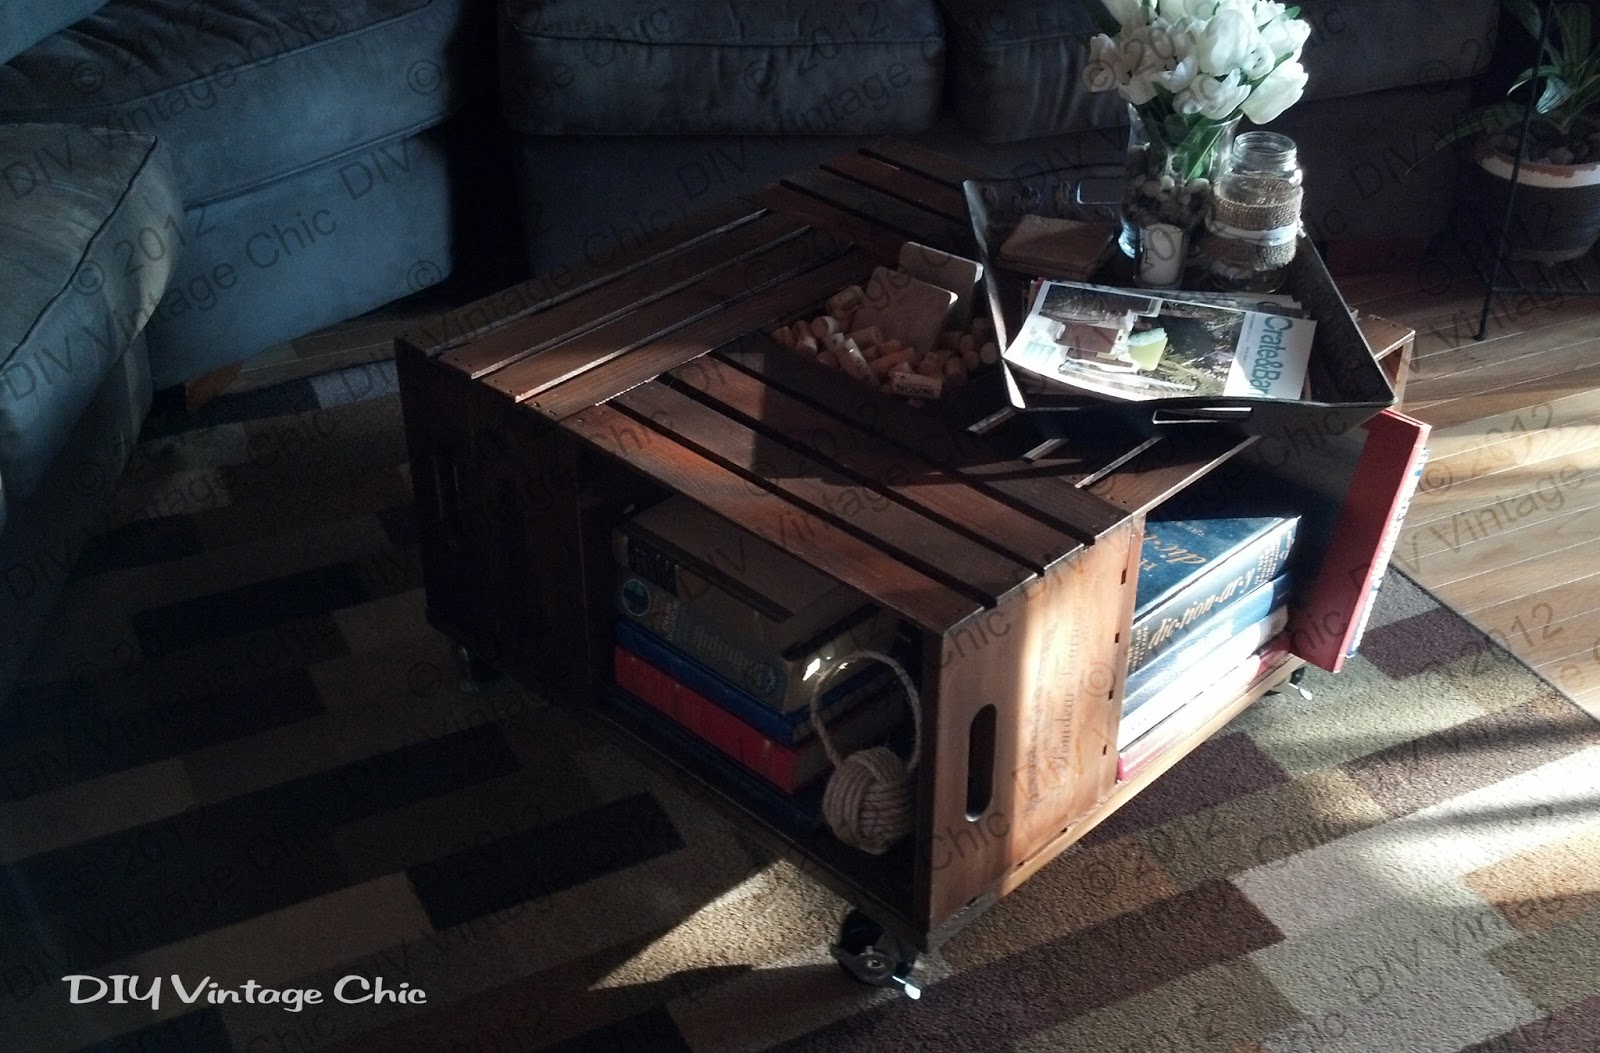
| A few books from Goodwill |
 |
| A few of my favorite inspirational magazines. Also included are my "coasters" also known as cheap tiles from Lowes. They'll be revamped this week and get their own blog. |
 |
| More magazines to flip through. And every artist's dream catalog.... Dick Blick. It's almost the size of a phone book! LOVE IT! |
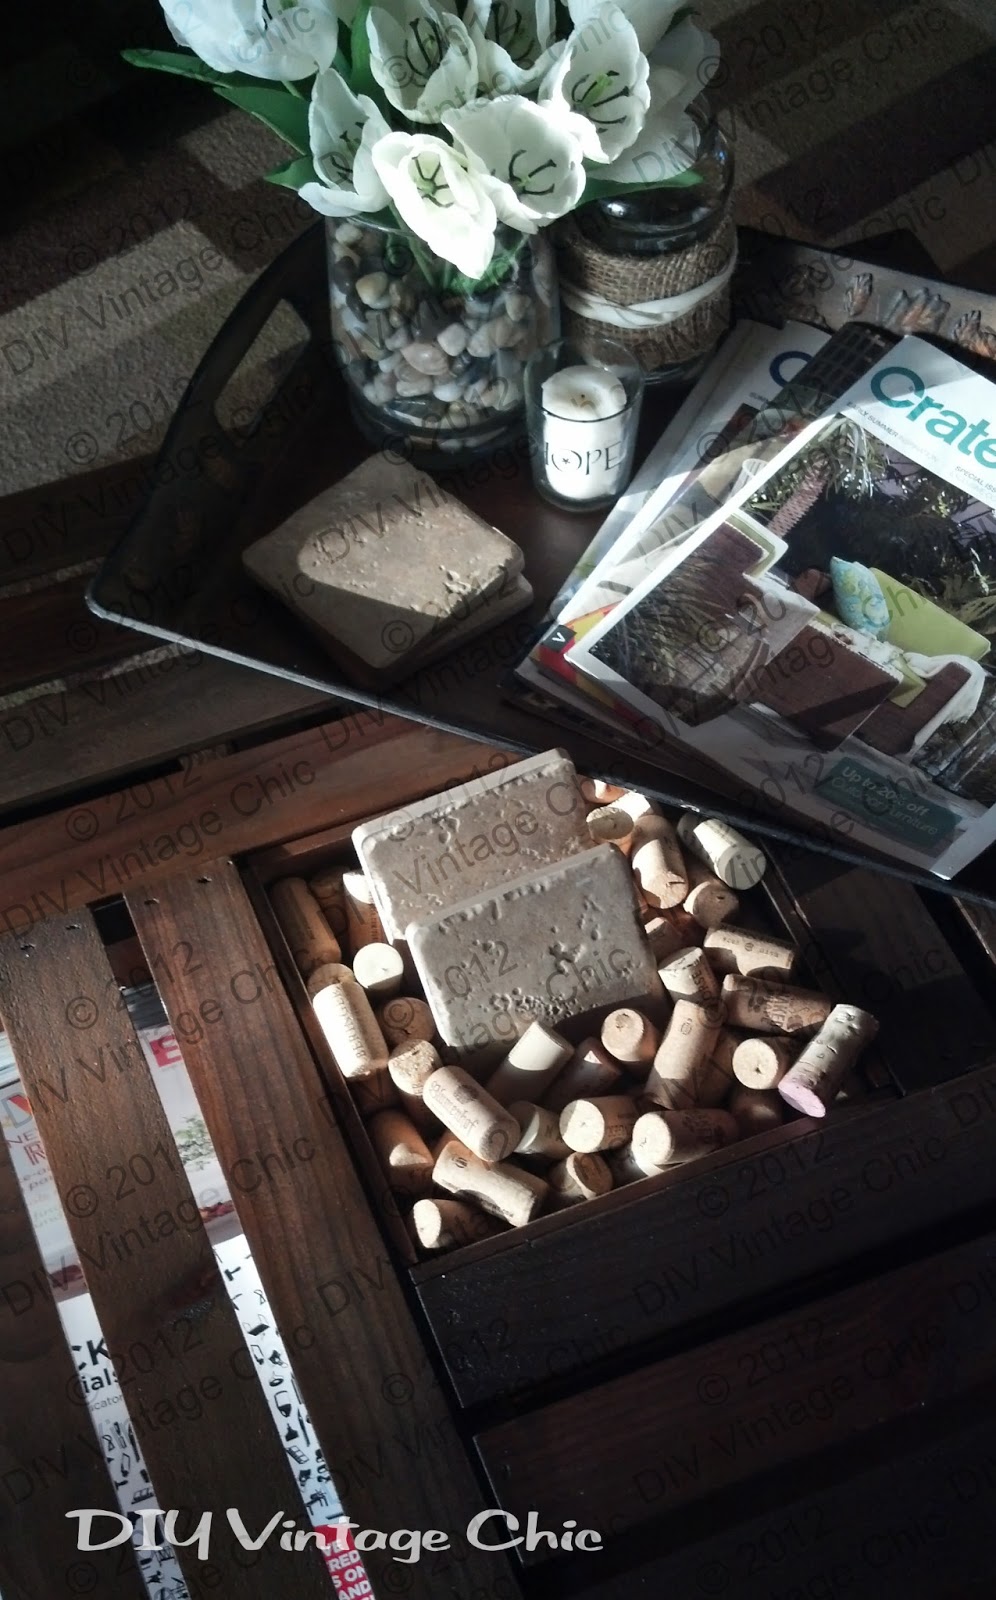 |
| Here was my thought with the coasters. When people use them and the coasters themselves become soaked, what do you do? Well, now I have a way dry them off for a while. I think it'll work a little better once I have rocks but the corks should do a pretty fabulous job in the meantime. |
See how I created casters with a rustic look.
 |
| Rustic casters replaced the shiny casters. |
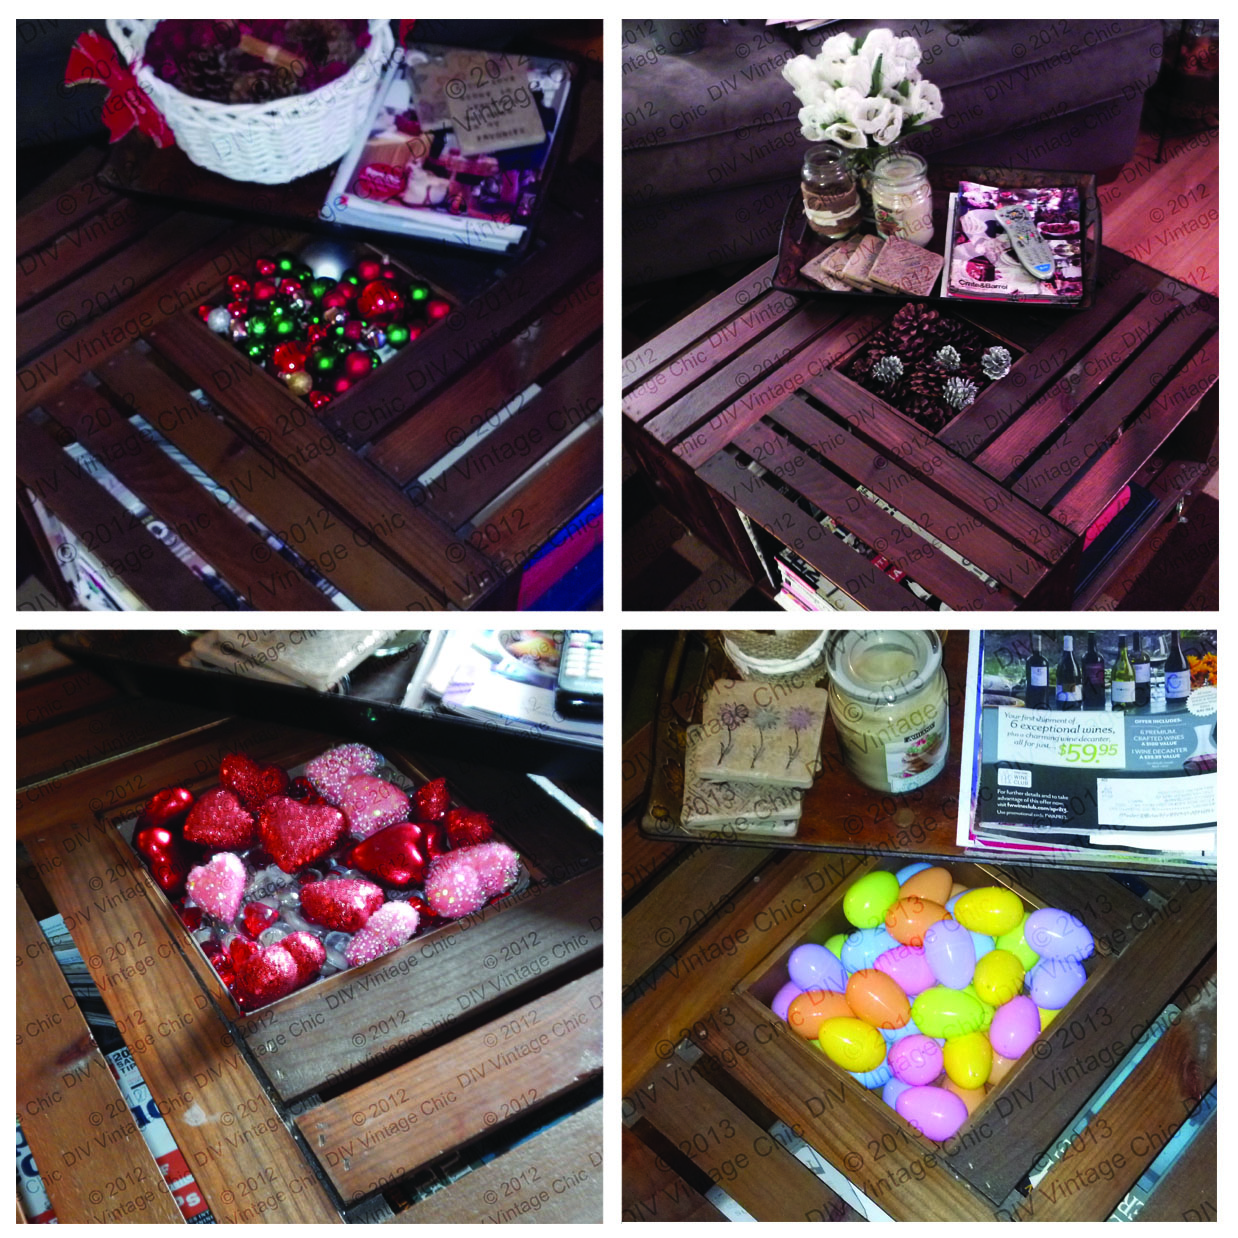
Check out how to update your table for Christmas time with my Christmas Coffee Table. Or other variations; pinecones, throw in some pink and red rocks with some decorative hearts for Valentine's Day, Easter eggs.
Side table is COMPLETE and also for sale!


Featured on: Gadgets4guys & O Globo.
Thanks for stopping by!
Becca
Linking up with: Knick of Time's Tuesday Link Party, Restore It Wednesday with Restore Interiors, Fridays with Redoux., Furniture Feature Friday with Miss Mustard Seed, Miss Mustard Seed's Furniture Feature Friday.
I love this! I have been searching for a coffee table with storage for the kids bonus room. Obviously, I didn't want to spend much since they are hard on furniture. This would be perfect. One question, you sanded after you stain and not before?
ReplyDeleteI did some minor sanding before just to take care of some rough edges but yes, I sanded after the stain to rough it up a little. Especially along any of the edges. I got back down to the bare wood.
DeleteCan you explain in more detail how you transferred the images onto the crates?
ReplyDeleteI'm working on a tutorial to demonstrate how you can transfer images to wood. My Vintage Clock blog shows a little more detail on how you can complete this though. http://diy-vintage-chic.blogspot.com/2012/06/vintage-clock.html
DeleteTutorial's up!
Deletehttp://diy-vintage-chic.blogspot.com/2012/06/transfer-image-to-wood-tutorial.html
This is the best idea ever for a coffee table! I have to say with 3 boys my table is shot. I hope to try and make one of these. This way if it gets banged up, it will add to the vintage look.But hopefully it wont get banged up ;)
ReplyDeleteGreat Job!!
Lesley
http://not2shabbycrafts.blogspot.com
No kids... just my dogs and their tails knocking things over take a toll on all the furniture. I know where you're coming from!
DeleteHow did you fill the hole in the middle to work it into your design?
ReplyDeleteI flipped the crates upside down, used a few scrap pieces of wood and L brackets. I only wanted the hole to be about 4-5 inches but you could make it taller depending on where you place the brackets.
Delete...I don't completely understand how you got the box in the hole? I have the same question as her, how would you attach it if you flipped it upside down..like you don't exactly do very good at describing how you did it..?
DeleteThere's not actually a "box" placed in the hole. The sides are the backside of your crates. Using L brackets and scrap pieces of wood you can create the bottom of the "box". You don't even need to flip your table upside down but then the L brackets will show.
Deletewhat was the finished size of your coffee table? Very cute!!
ReplyDeleteTina (the pic is my husband, not me :))
Where did you buy your crates from?
ReplyDeleteThey were purchased from Michael's but most craft stores have them.
DeleteIs that on oz? Thanks so much! And do you think bottle shops will have some nice wine box ends? This is amazing. Thanks so much!
ReplyDeleteI didn't even think about checking there. Not a bad idea!
DeleteI would check Bunnings
DeleteWhat do you search for in Graphic Fairy to find the images you used?
ReplyDeleteI think I did a search for French Typography. They didn't have as much as I hoped for which is why I grabbed some from the web.
DeleteI really want to try making this! But how did you make/assemble the frame?
ReplyDeleteHannah, if you look back at my pictures you'll notice I arrange the crates how I wanted them. I based my measurements for the frame on this. For extra support, where the sides of the frame connect I drilled holes in each board, filled the holes with wood glue, placed dowels into each hole and fit the pieces together. For the middle boards (that create the + ), I secured them to the frame using L brackets. Hope that helps!
DeleteThanks! I was looking at the frame and was wondering how you got it to stay together, so this answers my question perfectly! I'm going to buy crates at Michaels today!
DeleteGreat Idea! I would love to try this. I was just curious... what were the final dimensions? Was it low? Or is it about standard coffee table height? I am hoping it would fit nicely with our sectional sofa and not look too small, or be too low. Thanks.
ReplyDeleteFinal dimensions were 27"W x 27"D x 17"H. So the height is about average. I also have a sectional sofa but a small living room. I was wanting something a little smaller so there was more room. If you have a large living room it might seem small.
DeleteThanks! No, we have a small living room too. Does the height include the castors or just the boxes? I think this just might work for us! :)
Delete17" includes the castors
DeleteDid you just take the measurements for the base after putting the crates together?
ReplyDeleteYou got it! Look back @Hannah for how I created the frame
DeleteI love this table! What size are you crates? I am having trouble finding them.
ReplyDelete12.5"W x 18"L x 9.5"H. I found them at Michael's. http://www.michaels.com/ArtMinds%E2%84%A2-Wood-Crate-Carry-All/gc2159,default,pd.html?cgid=products-generalcrafts-unfinishedsurfaces&start=1
DeleteThank you!! I'm very excited to get started!
DeleteI think your coffee table is amazing! Thank you for sharing, I can't wait to make one :)
ReplyDeleteThis is amazing! Thanks for the great tips! One question though-- how did you fill the center hole? What did you use? I love the corks in the middle but what did you use to raise the wood up in the middle to hold up the corks? That is the only step I don't understand! Thank you so much!
ReplyDeleteI flipped the crates upside down, used a few scrap pieces of wood and L brackets. I only wanted the hole to be about 4-5 inches but you could make it taller depending on where you place the brackets.
DeleteHow did you 'transfer' the graphics?
ReplyDeleteI'm new to this, the gf is now making me build one.
Oh boy! A honey-do list! :) I just posted a tutorial on transfers, check it out!
Deletehttp://diy-vintage-chic.blogspot.com/2012/06/transfer-image-to-wood-tutorial.html
Hi! I love this table you made, but I have one question. Would you, if you were doing it all over again, stain with the tea & the vinegar/steel wool solution. It seems that the 2nd staining obliterated the first...but maybe it added a hue or some depth that I'm not picturing. Thanks for the detailed directions!
ReplyDeleteThe tea definitely adds something to the mix. My Burlap and Wood project from my Beach Bath Redo post shows how the wood will turn out with just the vinegar and steel mix. The tea adds the darkness. So it's a necessary steps if that's the color you're looking for... having said that, I was not planning on it being that dark originally. But I love it now!
Deletehttp://diy-vintage-chic.blogspot.com/2012/04/beach-bath-redo.html
Awesome, thanks! I really love this and would like to try it...if only I had the power tools on hand!
DeleteI know! For years I pouted because I couldn't do projects like these. Then I met the right guy! He was a good friend (still is), turned to great boyfriend, now my future husband AND he has power tools! WIN! ;)
DeleteHey! I am in love with this idea and plan to try it. I do have a ? though... what did you put in the middle? how did you create the little box?
ReplyDeletethanks,
haley
I flipped the crates upside down, used a few scrap pieces of wood and L brackets. I only wanted the hole to be about 4-5 inches but you could make it taller depending on where you place the brackets.
DeleteI love this idea! I'm new to the DIY furniture projects, but I am excited to get started. I'm also on a budget for furniture, so I was wondering approximately how much it was to complete? Thank you!
ReplyDeleteFor me it didn't cost too much because I already had a lot of the material on hand. But if you don't.... like I said I had a 40% coupon for the crates so that brought them to about $7 each, wood for the frame is about $8 and the castors I think are about $7 each = $64. That's not including any nails, screws, stain or finish you might need to buy.
DeleteIt turned out great! What an awesome idea.
ReplyDelete~Jes
Hi! What were the final measurement of the table? Or what size were your crates? My craft store had numerous sizes. I love this table!!
ReplyDeleteThe crates are 12.5"W x 18"L x 9.5"H. And the table turned out to be about 27"W x 27"D x 17"H. Thanks for stopping by!
DeleteI love this! I have looked for the wine images online, but I can't seem to find any. how did you get yours?
ReplyDeleteI believe I did a search for French Typography and found a couple of them that way. One was found on The Graphics Fairy. The link for that picture is included in my post. The last image was the logo from our favorite winery. I added a border again, from The Graphics Fairy.
DeleteThe SOS steel wool you used did it already have the soap in it? Can't find any SOS pads that don't?
ReplyDeleteI believe I actually found mine in the hardware dept at WalMart. This is what I purchased. http://www.walmart.com/ip/Rhodes-American-Multi-Grade-Steel-Wool/17300264
DeleteThe ones with soap do not work because they have an anti-rust component to them. I tried it and then read the box. I got regular steel wool pads at Lowes. I've been told that the 0000 work the best.
DeleteI absolutely love this idea - Looks like it came from an expensive furniture store! I'm hoping to make this my summer project, but I've only ever built something that came with a complete set of instructions. So, I apologize if this is a really stupid question...
ReplyDeleteWhen you're putting everything together (frame, and then the crates together) are there screws sticking out anywhere? I see from a previous comment that you used dowels and L-brackets for the frame - would that be in addition to screws? And when screwing the crates together, are the screws sticking out inside?
Thanks in advance! I'm so excited to get started!
For the frame, I believe I used 1-1/4" inch screws for the screwing in the frame (1x2 lumber is actually only 3/4" x 1-1/2", so 3/4" + 1/2" of the crate. No screws poked out.
DeleteI was able to use this same size when screwing the crates together
The L Brackets typically come with screws. They were small enough they did not poke out either.
Good luck! Feel free to send me an email if you have more questions.
I have two questions.
ReplyDelete1. how much did this cost to make
2. Is the hole in the middle all the way to the bottom or did you do something in the middle. It looks shallow, but I din't see in the instructions how you did it.
Sorry Cassi, I've been meaning to get both your questions into my blog. (They're there now!) But so you don't have to search...
Delete$64 for the crates, frame and casters {this does not include screws, nails, stain or finish)
I flipped the crates upside down, used a few scrap pieces of wood and L brackets. I only wanted the hole to be about 4-5 inches but you could make it taller depending on where you place the brackets.
This is SO cute! Do you think the crates would look okay painted white instead of stained?
ReplyDeleteAbsolutely! Very chic!
DeleteLove this!! Very nice job! I'm gonna make this but I'm gonna have my husband help me as I'm not very handy :)
ReplyDeleteDoes the it matter what kind of vinegar I use? I did it white vinegar, but the color hasnt changed.
ReplyDeleteI double checked, I actually used a bottle of apple cider vinegar but most instructions say white. Make sure your SOS pads soak for at least 24 hours for a darker stain.
DeleteAlso if you don't stain your wood with the tea first you won't get a dark stain from the vinegar solution.
Thank you! Can I use any tea? I hope mine comes as good as yours!!
DeleteIt would seem so, I used a Mango tea for mine and it came out fine.
DeleteI love this! I've spent a week collecting everything that I need, and I'm starting this project later today!
ReplyDeletePlease let me know how it turns out! I'd love to see someone else take on this!
DeleteDo you have to sand the whole thing down or just parts of it to look vintage? and then do you re stain it after you sand it or just put the finish on?
ReplyDeleteI sanded some of the rough parts of the crate, stained with the tea and stained with the vinegar, then sanded down the crates, making sure to really sand down the edges to make them look worn, then I put the finish on.
DeleteIs there an specific reason you made the frame the way you did? I'm thinking of just getting heavy duty plywood and having it cut to 27"x27" and attaching the crates directly to the board...
ReplyDeleteThat would work too! I wanted to be able to see through the slots in the crates, that's the only reason I wanted a more 'open' base. I thought about using a board too (much easier) but it's not the look I was going for. It may be a subtle difference that most won't notice though.
DeleteThank you!
DeleteI love this idea!! Thinking of trying it.. :) Was just wondering where you got your tray (with the flowers and coasters)? :)
ReplyDeleteGeez... I've had it for years... I want to say World Market.. maybe. :/ I'm sorry I'm not much help.
DeleteSo I started this yesterday.. It is pretty detailed.. Lol a few things.. I just couldn't figure out the l bracket thing.. Or find them for that matter until people asked over and over.. So the l bracket is used for supporting my center wood? Correct? I just settled for some shelf brackets that you won't see and had to guess a size.. Glad I was right
ReplyDeleteNext thing.. Don't buy stainless steel wool pads.. Duh.. But my husband had wool cheap ones & thx to google I found out vinegar plus bleach = INSTANT rust.. I didn't have to wait again since I used wrong pad.. And I love stain color & this project!! Thank u thank u!! Annd I hope my mistakes help someone else
Good to know about adding in the bleach! Thanks!
DeleteCan I invite myself over for a glass of vino? Love this - you'd never know they started life as unfinished MIchael's crates!
ReplyDeletePinning too!
Kelly
I'm always in the mood for a glass of wine! Thanks for stopping by. I love your site! I'm not a fan of Peeps but that wreath is adorable!
DeleteI'm stopping by from Miss Mustard Seeds Furniture Feature Fridays.
ReplyDeleteYou have done a fabulous recycle. You've given it new life!
I am building this! I love the rustic look as well asthe extra storage for my sons toys. I did find casters at home depot that are a rust color...the only thing is that they don't lock.
ReplyDeleteawesome!!!amazing!!super idea!!!
ReplyDeleteJust finished it and I love it! Made it for my daughters on campus townhouse! I only made one change. I used 6 inch decorative legs instead of wheel casters. It turned out so great that I'm trying to figure out how to make matching end tables. This was my first project and I had so much fun. Thanks for posting!
ReplyDeleteAwesome! I'd love to see pics. I was trying to think of some side tables and figured I'd turn a crate upright. The length is 18 inches plus the height of the casters/legs. Should be just about perfect.
DeleteWhat a great idea! I saw this over on Hometalk and I had to stop by to get all the details! I pinned this to the Hometalk board!
ReplyDeleteblessings,
karianne
I commend you on answering the same questions over and over....and over! I love the table but am wondering...how much did it cost, where did you find crates, and how did fill that dadgum hole in the middle!?!? Never mind, I'll just read the tutorial :-)
ReplyDeletelol! Thank you for stopping by. If you do have any questions please feel free to ask!
DeleteHow do you reverse the image for the transfer?I'm pretty handy just computer challenged.
ReplyDeleteYou want to flip the picture. I did this in Photoshop but there are a few free programs out there that will let you do this. It's usually in the same place as the rotate picture function. Also if your printer has an Iron On setting, this should flip the picture for you when you go to print.
ReplyDeleteWhat a fabulous coffee table!!! Pinned it. Going now to check out your other projects!
ReplyDeleteOkay, I feel so crazy asking this question. I am having a heck of a time visualizing how to make the base with l-brackets...
ReplyDeleteMaybe there is a depth to the base I can't see, maybe I am having a total ditzy moment.
What am I missing?
If you send me your email through my Contact page I'll forward a picture to you. Hopefully that will help
DeleteVery cool coffee table - totally filing this away!
ReplyDeleteGreat idea! And, your photos are super duper. Thank you so much. ~Merrill
ReplyDeleteMy hubs and I assembled all of mine yesterday. Just have to do a few more things and then it'll be ready to put on the patio!! So excited and thank you for sharing!!
ReplyDeleteWas your polyurethane in an aerosol can ? I bought one that sprays, but I'm not sure if it will coat as nice.
ReplyDeleteIt was not. And I don't think I've ever used Polyurethane from a spray can.... seems like it would be much easier but you're right, I don't know how well it will coat. There are plenty of nooks and crannies with this project.
DeleteI love your table. I wanted to make it right after I saw your post. But I was so disappointed because I couldn't find those crates:( I will keep looking though....:)
ReplyDeleteI love this coffee table. You do a great job. I hope mine turns out like yours. I have a big living room and I am going to make two of them and put them together to make one coffee table. The only problem is I would like two end tables, too. By chance do you have any ideas on how to make an end table that would match?
ReplyDeleteHope
I'm coming up with a few ideas for matching end tables. Hopefully I'll have something by the end of the summer!
DeleteBy the way, anonymous, you're an idiot. Messing with chemicals is serious business. Sodium hypochlorite (bleach) mixed with an acid (vinegar) creates.
ReplyDeleteHere's a quote on the chemical reactions:
"The reason that mixing bleach and vinegar is a health hazard is not related to the toxicity levels of Chlorine (chemical symbol Cl2) but due to the toxicity of Chlorine Monoxide (also called Dichlorine Monoxide, Chemical formula Cl2O). Adding any weak acid to bleach (or Sodium Hypochlorite, chemical formula NaClO) produces Hypochlorous acid (HClO):
NaClO + H2CO3 = NaHCO3 + HClO
Dehydrating HClO (with, for example, Calcium Nitrate) releases Cl2O, the gaseous anhydride of HClO. Chlorine Monoxide is a stronger oxiderizer than Cl2, which means it is more reactive with lung tissue and your eyes among other things."
"AnonymousThursday, June 28, 2012 6:14:00 PM CDT
So I started this yesterday.. It is pretty detailed.. Lol a few things.. I just couldn't figure out the l bracket thing.. Or find them for that matter until people asked over and over.. So the l bracket is used for supporting my center wood? Correct? I just settled for some shelf brackets that you won't see and had to guess a size.. Glad I was right
Next thing.. Don't buy stainless steel wool pads.. Duh.. But my husband had wool cheap ones & thx to google I found out vinegar plus bleach = INSTANT rust.. I didn't have to wait again since I used wrong pad.. And I love stain color & this project!! Thank u thank u!! Annd I hope my mistakes help someone else"
While I don't appreciate my reader being called an idiot, there is a good point here. I don't want anyone hurt trying to mix ingredients.
DeleteI love love love love love this!!! Totally your call, but I think you should keep the corks and nix the rocks! The corks add to the whole wine theme, and look adorable. I hope you make matching end tables! Good luck! You're truly innovative and inspiring! <3
ReplyDeleteThank you! I agree, the corks go with the whole wine crate theme. They'll be sticking around. You know how you get an idea in your head and want to stick with it.... glad I changed my mind. Thanks for stopping by!
DeleteYou talked about flipping a crate upright and adding legs to make the end table(s). Do you think adding a pine table top to it, with a hinge in the back (and cutting it along the crease like in a table with an insert)---so the top opens and you could store stuff inside---would be a cute idea?
ReplyDeleteDefinitely a unique idea for sure! I love it! There are so many possibilities with using the crates. You could easily do something similar with a coffee table.
DeleteLove this!!! My husband and I are building it right now! Cut and stained everything today and assembling it tomorrow. Yay!! I wanted it a little bit taller so I built two frames and stacked them on top of eachother, hopefully it will look ok. For side tables we decided on two crates attached with hinges( sort of like an old style trunk) and had it so the bottom of the crate will be the top of the table. Hopefully it will turn out ok.
ReplyDeleteGreat idea!
DeleteI made this piece a couple weeks ago now and am extremely pleased with the outcome! I made a few changes to mine though. I didn't quite get the staining process above. I made the solution with regular white vinegar and it didn't seem to change colour at all, it just got floaties in it. As a back up I bought stain from michaels and had a couple different stains that my dad had stashed in the shop. On a few pieces of wood I sampled each stain. In the end the solution just gave the look of "old grey barn" and that wasn't the look I was going for. I ended up using the stain I purchased at Michaels and I was so happy with the result. Also, I did the first coat of tea stain and found that didn't do much either. I really am amazed that you got that colour just with tea and that solution.
ReplyDeleteI decided to go for a square base rather than coaster wheels and was glad I went that way. Then I didn't have to do the frame either. In my middle I stuck two pieces of wood in between the slates of the crates so that I could put them at any level depending on what my center piece was or take them out completely and put a large vase in.
So glad you posted this idea and am now looking for something to do with side tables. I like the idea of the "trunk" type crates. I'll keep my eye on this post to see what other ideas come up. Wish we could post pictures though.
Someone else posted a pic of their table on my Facebook page. Feel free to do the same! I plan to work on my side table this weekend. :)
DeleteFirstly I think you do extraordinary work, and your step-by-step guide is perfect. Your a real professional, and your attention to detail is superb.
ReplyDeleteI understand what you mean about sanding so if I may, I recommend to your readers that they visit Winepine where all the sanding is done for you. Winepine also offers a very large selection of wine crates and wine boxes to choose from, and they're delivered right to your door.
In any event, thank you for your many contributions to art and enhancing home decor. This project came out beautifully!
How would you lighten the stain if you made another one? We are moving into a new house next month and this would be perfect for our Great Room.
ReplyDeleteI hope to have a tutorial on different ways to stain. I'm curious on how they all work too. For instance there seems to be a difference between using White Vinegar versus using Apple Cider Vinegar. To answer your question though, you may want to leave off the tea part. Just stain with the vinegar and wool solution. (Try it on a scrap piece of wood first)
DeleteWould a shellac work instead of the polyurethane? Just to make it smooth and easy to dust?
ReplyDeleteAwesome project!
I have no doubt that it would work however I think it might take away from the vintage style. But if you're going for a different look it would definitely be easier.
DeleteOne of the most clever coffee tables I've seen. You did a FABULOUS job. Creative and practical. I love it. Might just do one for myself! Thanks
ReplyDeleteLisa
Loved this idea very much! Very unique! Where did you source your crates though? I never seem to find any around where I live -- especially ones so nice as yours!
ReplyDeleteSorry! Just saw where you sourced the crates from! Pinned it! :)
DeleteI'm currently working on this project now. Because I stained mine before I put them together, the 2 cups of the vinegar solution only covered three of my crates.
ReplyDeleteAlso, instead of filling the hole in the middle with wood, I am actually putting a funky piece of tile in it to make it all one even surface.
Becca, thanks for this amazing project. I'm am loving it and it will look great in our house.
I am so in love with this idea. In fact my fiance and I are determined to make one of our own! Just a question though, after its all put together, what was your finished height on the table??
ReplyDeleteI believe it is 17"
DeleteI am re- creating your beautiful table for my living room and I have a quick question- do you varnish when it is complete? Thank you for your creativity!
ReplyDeleteI used a satin polyurethane
DeleteThank you so much for posting this! I just completed my table and I am SO pleased with the results. Our guests are loving it and have asked so many questions. I am not a DIY-person at all but your step-by-step instructions made this project SO easy to complete!
ReplyDeleteFor the stain, I ended up using Grade 000 steel wool (cause that's what I had) and ended up having to do 2-3 coats to achieve a darker color. The stain turned out beautifully. I looked it up and I think Grade 1 might be recommended.
Also, instead of the image transfer, I ended up using large stamps and that worked out well! I'm going to try to find your Facebook page to post photos of mine.
Thanks again! I'll definitely be re-visiting your site. I'm excited to see your side table!
Thanks for stopping by Michelle! I've been away for a bit but hopefully the side table will be completed soon!
Deleteawesome post! I found your blog through Pinterest. I really like that you shared the happy accidents and told your real story. I hope you've been enjoying this table. It looks lovely.
ReplyDeleteDo you know the measurements of the pieces you used to create the little box in the center hole? Also, it looks like you used some sort of thin material as the sides for the center insert rather than just putting a few pieces underneath, is this correct?
ReplyDeleteI absolutely LOVE it. What a great idea. Wine crates.
ReplyDeleteWho would have thought?
I like the colour and I want one....lol
Hopefully there will be some available for sale soon.... ;)
DeleteThis is the neatest idea for a table! Thank you for taking the time to post all of this for us to see!! Your explanations were PERFECT!
ReplyDeleteThanks Shelby!
DeleteHello,
ReplyDeleteNice Idea!!
I already made one like yours, but the only thing missing is that I coulnt find Mod Podge in my country :S
NObody knows what it is also i tried searching decoupage medium with no sucess, can you help me? what can I use instead, or another name for it?
Would be awesome your Help!
Thanks,
Gali-
Gali,
DeleteThanks for stopping by. If you haven't been able to find any kind of decoupage medium I think the next best thing would be Elmer's glue. PLEASE KEEP IN MIND, I've never done this. But I have heard of people using 3 parts Elmer's glue to 1 part water to create a decoupage medium. Good luck and tell your stores to start carrying MOD PODGE!!!
Thanks Becca I already finished the table!! look awesome i did it a little bit bigger than yours, and it also looks GREAT!
DeleteThanks for sharing...
my best wishes
This might sound as a silly question but I'm new at all this. So, why did you stain with tea/vinager instead of regular wood paint? Is there a difference in looks?
ReplyDeleteBTW, I pinned a table just like your two weeks ago from a furniture store and fell in love with it. After I saw the price, however, hated it. $340 plus $120 on shipping. Yikes. Now that I saw yours and how to make it, I'm loving it again. Thanks
Claudia,
DeleteFirst, thank you for letting me know about the Etsy shop. My fiance and I have discussed selling the crate tables ourselves so I was a little disappointed. We're working on a disclaimer now.
As far as the tea/vinegar stain... it was just something I wanted to try out.
Thanks!
Becca
Nice job with your coffee table, it looks great! I have this linked to my coffee tables post as well today, come on over and have a peek!
ReplyDeleteHey I saw your awesome creation on pinterest a couple months ago and re-pinned it. Guess what I came across on Pinterest today though? Someone totally ripped off your idea and she's selling it for $340 on Etsy... NOT COOL, in my opinion... oh well thank you for giving us a step by step guide on how to create this!!
ReplyDeletehttp://www.etsy.com/listing/105156860/rustic-crate-table?ref=sr_gallery_7&ga_search_query=crates&ga_view_type=gallery&ga_ship_to=ZZ&ga_min=0&ga_max=0&ga_ref=auto3&ga_explicit_scope=1&ga_search_type=handmade
My husband and I are trying to figure out the measurements of the frame. We do not have a saw so I have to have Lowes cut the wood for me. Do you happen to know the measurements of all 7 pieces for the frame?
ReplyDeleteThis is outstanding. I want one of my own. I actually was keeping this in mind while at the store and notice that meijer has crates similar to yours (so I don't have to stain)...so to take the easy way out I may try to do something similar using those
ReplyDeleteGetting to skip a step is always a positive in my book!
DeleteI am working on my own table, using this tutorial, but making a couple of changes to customize it for our family. So far, so good. I am not a very accomplished builder, but it seems to be coming along well. I'll let you know how it turns out. Thanks for the great idea!
ReplyDeleteGood luck! Making it your own is the fun part!
DeleteQuick question: Have you had any problems with the strength of your tabletop? I got the main body of the table and the support structure underneath all put together, but, now that I have turned the table upright and taken a good look at it, the slats on the tabletop seem kind of flimsy. I am toying with the idea of adding a support beam under the middle of each section, if that makes sense. However, I'm afraid that would ruin the look of it. I am also considering getting a glass top to cover the whole thing, which deviates slightly from my original plan of just having glass over the center section. That might be a good idea, anyway, since I have three kids. Just wondering what your experience has been, now that you've been using your table for a while. Thank you!
ReplyDeleteI haven't had any problems but I also don't have children. A glass top might not be a bad idea for you if your concerned though. I'd hate for any little kiddos to get hurt. :(
DeleteI LOVE this table and cant wait to make one. I saw it on ETST for $349 and will not pay that!
ReplyDeleteThanks so much for your post and your beautiful idea! I look forward to more posts.
kelli.
Thanks for stopping by Kelli!
DeleteI love it, thanks for the idea, will try it. from Argentina .
ReplyDeleteWould really love to make this. Any chance you can share the directions? I'm without a table at the moment and this one is perfect.
ReplyDeleteHi!! I love this idea!!! I was wondering if I could get a step by step on how this was done!! I would really like to build one of my own but I lack the creative bug :-/
ReplyDeleteThanks do much!!
Lesa
This is absolutely the most wonderful coffee table I've ever seen! I'm so sorry to see that someone has taken your idea.
ReplyDeleteIf you're still willing to share your instructions I'm planning on making a copy-cat for my living room. This is absolutely just the most perfect square table I've been looking for!
Thanks so much for the wonderful idea!
Marge
Marge, directions are back up! Good luck and thanks for stopping by!
DeleteInstead of pulling the post, why don't you offer the completed table yourself at a lesser price and let the dieters have at it? I don't know why someone would charge $460 for a table like this, especially when the crates are only $12 at Joanns fabric. If you don't want to sell it I don't see how you can be upset that someone else is motivated enough to do so. Ana whites site is dedicated to back engineering pottery barn and other furniture. I don't think she would care one lick if someone started selling finished products based on her design. Face it, some people are just not meant to work with wood or have no desire to do so. Their next option is to pay someone for it.
ReplyDeleteThanks for your feedback! I am planning to sell different varieties of my table soon and definitely not for that price. I understand that knock-offs will happen but this table wasn't an idea I saw in any Pottery Barn-type store. This was my own creation 100% of the way. I've updated this blog a number of times to help my readers. When I first created it there was a lot of trial and error.
DeleteI realize I've posted the directions so maybe this was bound to happen. I guess I'm still naive in this big ol' world thinking people will do the right thing.
You see the table, you like it, you want to make one, great! But make it your own ESPECIALLY if you're going to sell it. Or give credit where it's do.
Thanks again! {And I'm going to have to check out Anna White's site}
For what it's worth, my wife and I love this table. I get what you mean about putting yourself out there and hoping people do the right thing. I wonder if there's some sort of copywrite statement you could put on your posts that might offer some protection. From personal experience, ppl will still steal if they think they can get away with it. Sucks I know. Hang in there. Thus was a really great idea and I love the detail you added.
DeleteHi Becca,
ReplyDeleteI love this table! Its a shame that Esty had to go and steal your idea, I have sent an email through their contact form, complaining. I understand where you're coming from. Jsradtner, I think its more a case of Esty coming along and stealing the idea, rather than asking Becca if she would mind.
Becca, are you willing to share the instructions via email?
Thanks,
Mel
Melissa, the directions are back up. Thank you for your patience!
DeleteI found a pin on pinterest the other day for a similar looking table, I was highly disappointed when it took me to the etsy shop. I was super excited that I found another pin on pinterest that took me to your site...only to be disappointed again when I found you've pulled the directions because of the etsy rip off. I hope they remove it off etsy soon so I can lean how to make this beautiful table.
ReplyDeleteThanks for the instructions! Can't wait to try this- will be using vintage apple crates from a local orchard :) Also instead of casters I'm going to throw on some bun feet from a local home improvement store! Love it!
ReplyDeleteHi Becca,
ReplyDeleteThank you for posting this wonderful table. I just built mine this weekend. Living in a tiny New York apartment, I had to improvise on some steps (like getting wood cut at a local hardware store, and using water-based stain/poly).
One thing I decided to do differently from your base design was that instead of using casters, I created a 20x20x4 base so it appears that the crates are floating. Additionally, I purchased hardware for a lazy susan (like $6) and installed that on the base so I could spin the table 360 degrees :)
I am sorry someone is selling your idea. This is a very creative idea. I was wondering if there was any update on end tables?
ReplyDeleteThankw
I am SO EXCITED to do this.. Question though, do you think the frame is necessary? I'm not planning on adding casters. Although I may want to add little legs, which in that case I would add a frame.
ReplyDeleteAlso wanted to add I drew up a little plan for this and I am going to make a kind of shadowbox type thing out of the middle.. so so so so excited!!
The frame might not be necessary but it does add more support. If you add anything to the bottom, legs or casters, you should build a frame though.
DeleteI did this myself today actually and used a sheet of plywood that I had cut to size at Home Depot. Then the hole in the middle can be a tall case filled with whatever I want!! Thanks for the idea to paint before putting together and well the whole idea! It's so perfect!!
DeleteThis kind of table is what I want in my living room. It is multifunction and we can save the space for other furniture.
ReplyDeleteLove this, it looks brilliant.
ReplyDeleteDid you use 1x2s or 1x4s for the frame?
ReplyDeleteHmmm.... I think you're the first one that has caught that. I used 1x4s. Thanks! I'll update the instructions.
DeleteHi Becca, thank you so much for sharing your project! My hubby (who is thankfully very handy) and I are half way into it and only have one question: Our steel wool/vinegar solution has been sitting for almost 24 hours now but the color of the solution has barely changed... It basically looks clear like vinegar still.. you said yours turned into a murky brown?! Any idea why this may have happened?
ReplyDeleteAre you using steel wool or STAINLESS steel wool? The stainless won't rust quickly.
DeleteI found the 'Fabrique' graphic that you used, but don't see a 'reverse image' on 'The Graphic Fairy' website, how did you reverse this graphic?
ReplyDeleteThanks!
Laurie, you can see if your printer has an Iron On Transfer setting. That will reverse the graphic. Otherwise you'll need to open the file in a program, like Photoshop, that can reverse the image.
DeleteThis is very cool. I came over here from Tip Junkie. For the casters, you could try using Rustoleum's oil rubbed bronze metallic spray paint to give it a more vintage feel.
ReplyDeleteOoohhh, I'll have to give that a try!
DeleteThe table is gorgeous! I saw a Pin of it on Pinterest and I'm so glad I found the instructions. I'm probably missing something very obvious, but I'm confused about how you attached the L-brackets and the wood to make the 'well' in the middle. Could you (or someone else who's made the table) explain it to me?
ReplyDeleteI love this idea for a coffee table & I also love your idea using the planter as an end table, great job on both. Now I need to get started!! I think I will make this my fall/winter project..;)
ReplyDeleteThis is beyond fabulous!!
ReplyDeleteLove the table! How sturdy is it? I'm wondering if I could turn it into some sort of a bench...safe to sit on or not so much? Thanks!
ReplyDeleteMindy, if you're buying your crates from Micheal's like I did I don't think they would be sturdy enough for a bench. Next time I build one of these I'll probably build my own crate so they are tougher.
Deletethis idea is amazing. i had to make one as soon as i saw it. so my bf and i did and we had so much fun while we built it. thank u for posting such a unique idea. ours turned out beautifully.
ReplyDeleteYou are amazing! This is such an awesomely creative idea. I'm heading to Michael's and the hardware store tomorrow to collect supplies! This will be my first DIY project and I can only hope & pray it comes out at least half as gorgeous as yours did! If it does, I'll share a photo...if it does not, I'll sit in the corner and cry lol
ReplyDeleteWish me luck!
Thanks for the awesome idea! My husband and I made this over the weekend and we love it!!
ReplyDeleteWow excellent piece of work very inspiring and crative!I appreciate your creative work keep it up!!
ReplyDeleteThanks for the inspiration! I've just linked up to your blog over at: http://belleandbeauantiquarian.blogspot.com/
ReplyDeleteI don't know what I'm doing wrong but my table has been at a stand still because I've been trying to make the vinegar stain for a week with no success!! Help?!! I bought apple cider vinegar. I bought the same steel wool pads you linked in a previous comment--I purchased the course kind....didn't think that mattered. I've tried putting the wool in without washing it out. I've tried pulling it back out and washing it. I've tried in a closed container; I've tried it open. I don't know what else I am possibly missing?! Making me crazy! I'd appreciate any help--thank you!
ReplyDeleteKim - maybe trying cutting up the steel wool into pieces. I've completed a few projects with the vinegar technique and cutting the wool into pieces seemed to speed up the process. Otherwise.... maybe try a different vinegar? I'm sorry I can't be much help.
Deletejust seen the crate coffee table and its amazing going to try and make the lot ,crates and all your really a great artist hears an idea for you you probably made one already but you made me think of a chair with two crates on top of eachother to one side of the chair to hold book and stuff .they could then act like an arm rest .im gonna try this too when i get round to it :) thanks !
ReplyDeleteThis is AMAZING! I hate the fact that someone ripped your design for profit, but I am thankful that you continue to share this with people like myself and those who posted above.
ReplyDeleteLike most I cant wait to get started. Hopefully something can be done about the esty site.
I love the coffee table with storage, more useful.
ReplyDeleteNice....new follower
ReplyDeleteThis is beautiful! I want one of these custom crates for my home right now! Like, it has such a beautiful, vintage feel to it and I love it. If only I could keep my kids away from it...
ReplyDeleteI want to make a bookcase with these crates. I need 10 of them though which would cost way more than I want to spend. How did you get your 40% off coupon. Was it just like a weekly coupon Michael's has? Right now their percent off entire purchase coupon is 25%.
ReplyDeleteCheck back next week. Usually they have 40% off but sometimes they switch it up
Delete20 yrs ago as a new college student with my first apartment, I used old ammo and wine crates for my coffee table and my book shelves. Loved it. Wishing I still had those crates! lol I've been looking all over for a coffee table for our living room.
ReplyDeleteDid you really use 1x2x6 for the frame it looks like 1x4 from the picture?
ReplyDeleteI don't have the table in front of me right now. Either size should work for the frame though
DeleteDo you have any pictures of exactly where you put the screws and L brackets for the frame, the crates, and the center hole? Thanks for posting such a great idea!!
ReplyDeleteCould you please tell me what size casters you used? 2"? 3"?
ReplyDeleteits amazing ideas, thank you
ReplyDeletethanks for sharing this post with us
ReplyDeletei love your pretty tastes
ReplyDeletethis is my first visit for this blog but i will follow it :)
ReplyDeleteDid you ever come up with a good idea for side tables?
ReplyDelete